Managed metadata is a hierarchical collection of centrally managed terms that you can define, and then use as attributes for items in Microsoft SharePoint Server 2010. A column is a location in a list in which to store information about a SharePoint Server 2010 item. When you define a column, you provide a name for the column, specify the column's type, and provide additional information that depends on the column type. SharePoint Server 2010 introduces a new column type named managed metadata. When you create a managed metadata column, you specify the term set from which the column's values must come. When you want users to provide information for list items (including documents), and the valid values for the information are contained in a term set, use a managed metadata column. Here we will be seeing just how to create Group, Term sets and term, then how to use them in Managed Metadata column. To know more detailed view of Managed Metadata Service go to this link http://technet.microsoft.com/en-us/library/ee424402.aspx. If we want to create Managed Metadata column we need to configure Managed Metadata Service in the Central Administration.
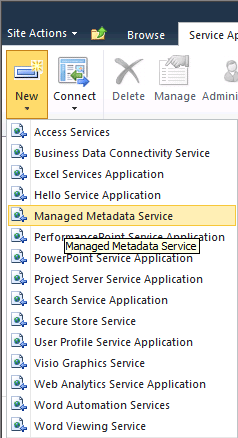
How to configure Managed Metadata Service Application:
The steps involved to configure Managed Metadata Service are given below.
Steps Involved:
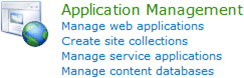
- Go to the Central Administration->Application Management->Manage Service Applications.

- In the Ribbon click on New to create a new Metadata Service.
- Enter the Name, Database Name and Database Server Name. Now your metadata service is ready.
- Click OK.
- Now the Managed Metadata Service has been created.
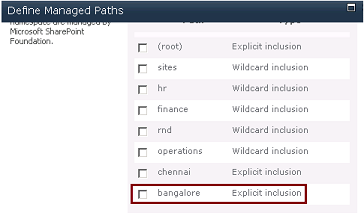
Taxonomy Term Store:
SharePoint Server 2010 includes the Term Store Management Tool, which you use to create and manage term sets.
A term is a word or a phrase that can be associated with an item in SharePoint Server 2010.
A term set is a collection of related terms. The following steps should be followed to create group, term set and term.
Steps Involved:
- Go to the Central Administration->Application Management->Manage Service Applications.
- Click on the Managed Metadata Service.
- You will enter into the Term Store Management Tool.
- On the left hand side you could see Taxonomy Term Store.
- First we will create a group for the Term Sets.
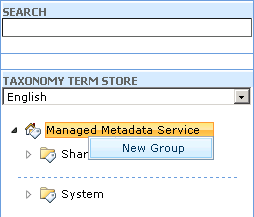
- Click on the Managed Metadata Service a New Group menu appears.
- Click on the New Group.
- Enter the name for the group as Sharepoint.
- Now click on the Sharepoint a menu will appear.
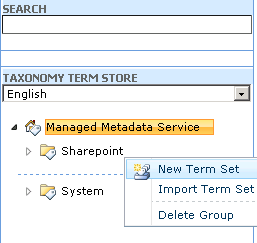
- Select New Term set.
- Enter the name for the Term Set as Analysis.
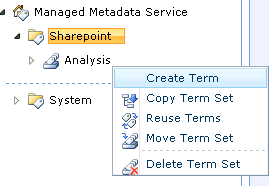
- Now click on the Analysis a menu will appear.
- Select Create Term and enter the name.
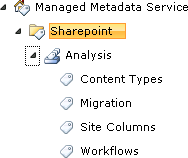
- Now we have created Group, Term Set and Terms for the service.
Create Managed Metadata Column in SharePoint List:
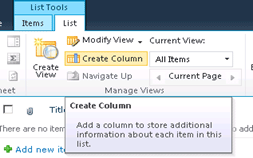
- Go to the Custom List where you want to create Managed Metadata column.
- Go to List Tools => List => Create Column.
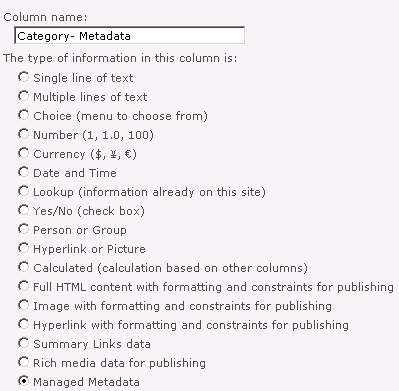
- Choose the name for the column as Category - Metadata and choose the type of information as Managed Metadata as shown in the below figure.
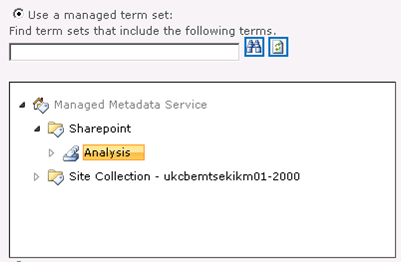
- Choose the term set that we have already created when configuring the Managed Metadata service and click ok.
- Thus Managed Metadata column is created.
- Add a new item and in the Managed Metadata column we have created you could see all the terms that we have created for Analysis and you could choose any one of them.
- This is similar to a choice field but you can't reuse the choices in the choice field whereas in Managed Metadata we can reuse the terms and it is centrally managed.
- If choices in the choice field will change frequently and the field will be reused in multiple locations use a Managed Metadata field.
Thus Managed Metadata column is created and we will see how to use this Managed Metadata across farm levels in the next article.
Taxonomy in SharePoint 2010
Taxonomy in SharePoint 2010 is realized through Managed metadata services (MMS). MMS is a hierarchical collection of centrally managed terms that you can define, and then use as attributes for items in SharePoint 2010.
The structure of Managed metadata affects many parts of your SharePoint Server solution, such as the following:
The structure of Managed metadata affects many parts of your SharePoint Server solution, such as the following:
- Valid values for columns and the way users enter these values.
- The enterprise keywords that users can apply to SharePoint Server 2010 items.
- The way that search results can be refined.
- How documents are routed.
- The workflows that are applied to SharePoint Server items.
- The ways that users can sort and filter SharePoint Server items.
- If you are using social tagging, the tags that users can apply to items that are not SharePoint Server items.
Term Sets, Groups and Terms
Vocabulary can be built in SharePoint in the form of Term Sets and Terms, as in the following example:
Conference rooms (Group)
Vocabulary can be built in SharePoint in the form of Term Sets and Terms, as in the following example:
Conference rooms (Group)
- Auditoriums (Term Set)
- Auditorium C (Term) [Term Properties - Available for tagging, Language, Description, Default Label and Synonyms]
- Auditorium D
- Auditorium E
- Halls
- Hall A
- Hall B
- Second floor
- Room 256
- Room 257
Process of Building a Taxonomy
The following diagram depicts the process to build taxonomy:
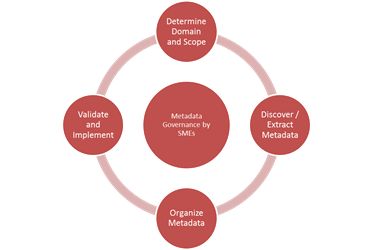
Figure 1: Process to build taxonomy
The following diagram depicts the process to build taxonomy:
Figure 1: Process to build taxonomy
- You need to start by defining the subject area and listing the concepts. You will start with the broader level and then gradually lower the level of detail.
- You can gather the metadata either from your relevant industry, internally from content in your organization, subject area experts, existing taxonomies etc. It may lead to certain overlap in term sets.
- Next you need to organize these term sets using either a top down or bottom up approach. It will lead to gap identification.
- Validate and then implement them.
- A metadata governance board will keep check on the scope, timelines and validation of term sets.
Classification of data
- Data is proprietary to the organization
- May be based on LoBs
- May be department based
- May be function based
- May be Regional
- May be based on Products
- May be Project based
The following diagram illustrates how various kinds of SharePoint-based solutions might require various approaches to taxonomy based on business need:
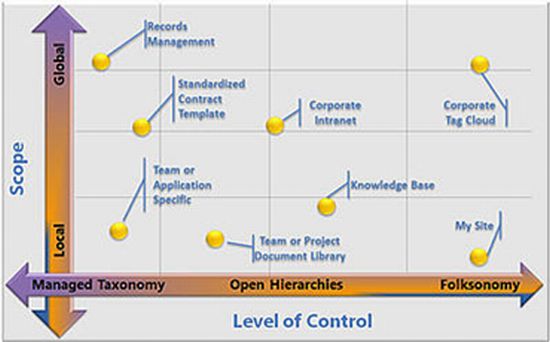
Figure 2: Taxonomy approaches based on business needs
Designing managed metadata services
An example of how to design the managed metadata services infrastructure is shown below:
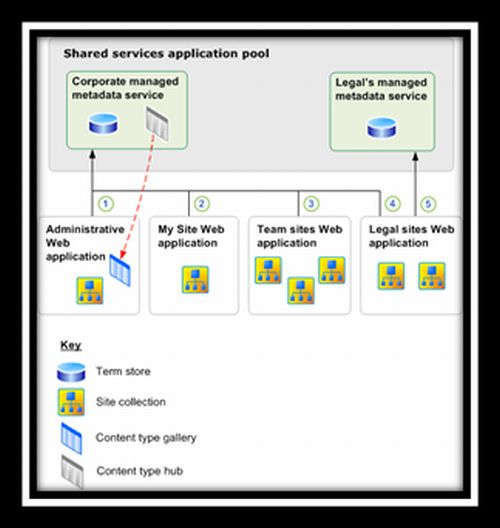
Figure 3: Ex. of Designing managed metadata services
Global Term Sets - The corporate taxonomy is represented by global term sets in the term store that is associated with the corporate managed metadata service. The content type hub that is associated with the corporate managed metadata service makes shared content types available to users of all site collections.
Every Web application has a connection to the corporate managed metadata service. The connections from the My Site Web application, the team sites Web application, and the legal sites Web application, numbered 2, 3, and 4 in the figure, all have restricted access to the corporate managed metadata service. Restricted access lets users of the sites in these Web applications use the shared content types and global term sets, add new enterprise keywords, and create local term sets, but it prohibits them from modifying global term sets.
The administrative Web application hosts the site collection from which authorized users manage the corporate taxonomy and the shared content types. The site collection's content type gallery contains the shared content types, such as the updated document content type that reflects the additional required properties. This content type gallery is the content type hub of the corporate managed metadata service. The connection from the administrative Web application, numbered 1 in the figure, has full access to the corporate managed metadata service.
Local Term Sets are created within the context of a site collection, and are available for use (and visible) only to users of that site collection. For example, the term store that is associated with the legal department's managed metadata service contains term sets that represent confidential information that the legal department uses. Only the legal sites Web application has a connection to legal's managed metadata service, so that users of the site collections in the legal sites Web application can manage their term sets.
Permissions
Application Pool Level
The following table summarizes the permission that each managed metadata service grants to the accounts that the connections use to access the service. Note that a local farm is explicitly given reduced permission. If you do not remove or reduce the permissions for a local farm, other local accounts will connect to the services using the permissions that are specified for the local farm.
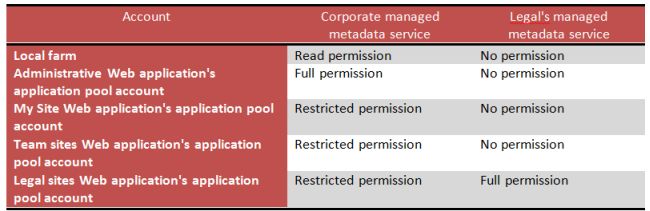
Figure 4: Ex. of Permissions at Application Pool Level
Group Level
Permissions can also be given at group level. Groups define security boundaries. A group is a set of term sets that all share common security requirements. Only users who are designated as Contributors to a specific group can manage term sets that belong to the group or create new term sets within it.
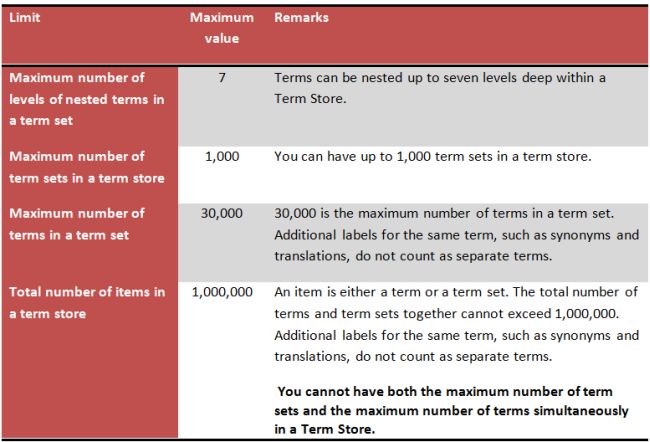
Capacity Planning for Term Store (database)
The following table lists the recommended guidelines for the organization of managed metadata in a Term Store:
You can create multiple managed metadata services, and share multiple term stores and content types from multiple site collections. However, each managed metadata service must specify a different term store. When you specify a nonexistent database for the term store, a new database is created.
Term Store Management Tool
SharePoint Server 2010 includes the Term Store Management Tool, which you use to create and manage term sets. If you have the appropriate permissions you can use the Term Store Management Tool to:
Figure 2: Taxonomy approaches based on business needs
Designing managed metadata services
An example of how to design the managed metadata services infrastructure is shown below:
Figure 3: Ex. of Designing managed metadata services
Global Term Sets - The corporate taxonomy is represented by global term sets in the term store that is associated with the corporate managed metadata service. The content type hub that is associated with the corporate managed metadata service makes shared content types available to users of all site collections.
Every Web application has a connection to the corporate managed metadata service. The connections from the My Site Web application, the team sites Web application, and the legal sites Web application, numbered 2, 3, and 4 in the figure, all have restricted access to the corporate managed metadata service. Restricted access lets users of the sites in these Web applications use the shared content types and global term sets, add new enterprise keywords, and create local term sets, but it prohibits them from modifying global term sets.
The administrative Web application hosts the site collection from which authorized users manage the corporate taxonomy and the shared content types. The site collection's content type gallery contains the shared content types, such as the updated document content type that reflects the additional required properties. This content type gallery is the content type hub of the corporate managed metadata service. The connection from the administrative Web application, numbered 1 in the figure, has full access to the corporate managed metadata service.
Local Term Sets are created within the context of a site collection, and are available for use (and visible) only to users of that site collection. For example, the term store that is associated with the legal department's managed metadata service contains term sets that represent confidential information that the legal department uses. Only the legal sites Web application has a connection to legal's managed metadata service, so that users of the site collections in the legal sites Web application can manage their term sets.
Permissions
Application Pool Level
The following table summarizes the permission that each managed metadata service grants to the accounts that the connections use to access the service. Note that a local farm is explicitly given reduced permission. If you do not remove or reduce the permissions for a local farm, other local accounts will connect to the services using the permissions that are specified for the local farm.
Figure 4: Ex. of Permissions at Application Pool Level
Group Level
Permissions can also be given at group level. Groups define security boundaries. A group is a set of term sets that all share common security requirements. Only users who are designated as Contributors to a specific group can manage term sets that belong to the group or create new term sets within it.
Capacity Planning for Term Store (database)
The following table lists the recommended guidelines for the organization of managed metadata in a Term Store:
You can create multiple managed metadata services, and share multiple term stores and content types from multiple site collections. However, each managed metadata service must specify a different term store. When you specify a nonexistent database for the term store, a new database is created.
Term Store Management Tool
SharePoint Server 2010 includes the Term Store Management Tool, which you use to create and manage term sets. If you have the appropriate permissions you can use the Term Store Management Tool to:
- Create or delete a term set.
- Add, modify, or delete terms.
- Arrange managed terms within a term set into a hierarchy.
- Define synonyms.
- Import terms.
- Make enterprise keywords into managed terms by moving them into a term set.
Managed Metadata Column Limitations in SharePoint 2010
Some of the limitations of Managed Metadata Columns are mentioned here:
Some of the limitations of Managed Metadata Columns are mentioned here:
- No InfoPath support
- No SharePoint Workspace support
- No support in Office 2007
- Cannot Edit Managed Metadata values in Datasheet Mode
- You cannot use the "Begins With" or "Contains" operators for filters in views
- Cannot be used in calculated fields
- Maximum of 250 terms selected per Managed Metadata Column
- Taxonomy feature is not activated on the Blank Site Template
- Cannot add a Managed Metadata Column through SharePoint Designer