Search This Blog

Monday, March 30, 2015

Session state can only be used when enableSessionState is set to true error in SharePoint 2010

The full error message which comes as: Session state can only be used when enableSessionState is set to true, either in a configuration file or in the Page directive. Please also make sure that System.Web.SessionStateModule or a custom session state module is included in the <configuration>\<system.web>\<httpModules> section in the application configuration.

Solution:
Approach-1:
- We have to enable session state for the pages by adding enableSessionState="truein the page directives.

- Then we need to modify in the web.config file like below:

Go to the <modules runAllManagedModulesForAllRequests="true">
Remove <remove name="Session" />

And add the below line:

<add name="Session" type="System.Web.SessionState.SessionStateModule" preCondition="" />

Now Save this and it should work fine.

Approach-2:
Run the below PowerShell command:

Enable-SPSessionStateService –DefaultProvision

Wednesday, March 25, 2015

Some Good Url

http://netsourcecode.blogspot.in/2011/09/creating-sequential-workflow-in-visual.html

http://netsourcecode.blogspot.in/2013/10/hiding-save-and-close-button-in.html

Hide a list from the Quick Launch Navigation bar in Sharepoint 2010 programmatically


The Quick Launch Navigation bar can be enabled and disable with the SPList object, in fact it is one of the properties of this object.
To show you how it works I have decided to explain a small example. I have cerate an EmpTy Share Project , added a feature and Add a Feature Event Receiver. I have pasted the code in FeatureActivated method so when it is activated will hide the list.
This is the code:
using (SPSite _sSite = new SPSite("http://panshare23/sites/testsite/"))
{
  using (SPWeb _wWeb = _sSite.OpenWeb())
  {
     SPList _lList = _wWeb.Lists["Shared Documents"];
     _lList.OnQuickLaunch = false;
     _lList.Update();
  }
}          

image

image


Create a Workflow using Visual Studio 2010

Introduction

In this article we can experiment with creating a Workflow using Microsoft Visual Studio 2010. Visual Studio along with SharePoint 2010 Extensions provides sophisticated development tools to enable Workflow development.

Types of Workflows

There are basically two types of workflows inside Visual Studio:
  • Sequential Workflow
  • State Machine Workflow
Sequential Workflow once invoked continues execution until it is completed.
State Machine Workflow will have states persisted in between. The state could be continued execution between machine restarts.
In this example we are trying to create a Workflow which on activation updates the null Address column of the Manager list. (You need to have a Contact template named Manager.)
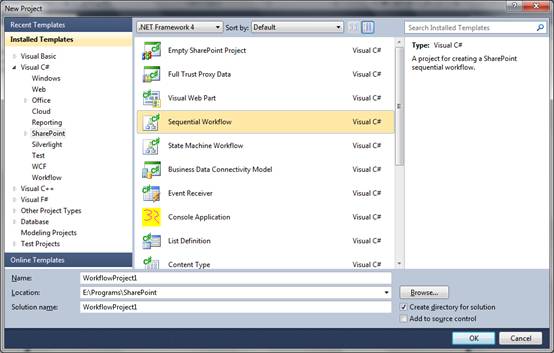
Step 1: Create Sequential Workflow Project
For the time being, we can start with a Sequential Workflow. Start Visual Studio and create a new project from the template SharePoint > Sequential Workflow.
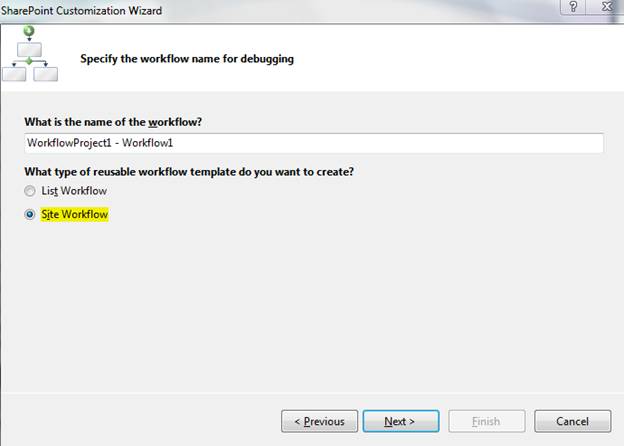
In the next screen select the option Site Workflow as shown below:
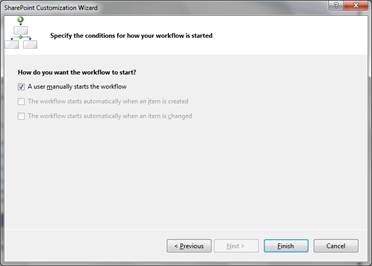
In the next screen, leave the default option saying the user manually starts the Workflow. Click the Finish button to create the project.
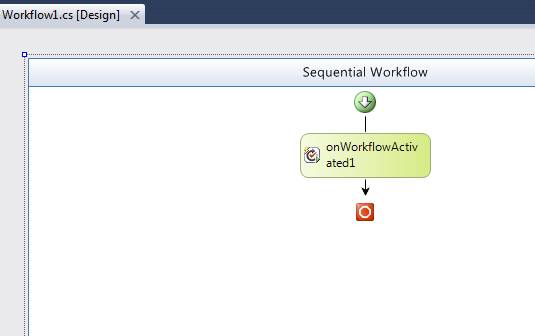
You will get the following screen once the project is created.
Step 2: Create Activity
We need to create an Activity to perform our job.

What is an Activity?

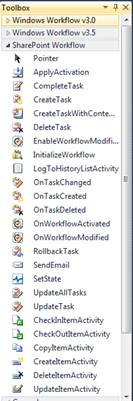
A Workflow consists of a series of Activities. We can add Activities using the Toolbox. There are different types of Activities like Code Activity, SendEmail, etc. For our example we are using the more functional Code Activity.
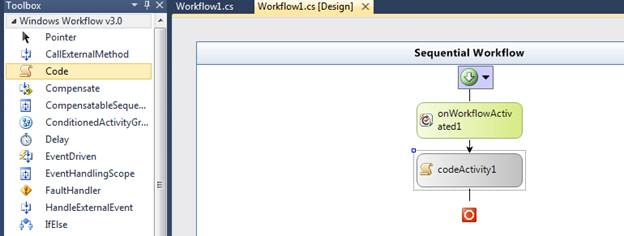
Drag and drop a Code Activity from the toolbox. You can locate this from the v3.0 group inside Toolbox.
Step 3: Add code for the Activity
Now we need to add code for this Activity. Double click on the codeActivity1 item shown above. Place the following code in the appearing code view.
private void codeActivity1_ExecuteCode(object sender, EventArgs e)
{
    using (SPWeb web = SPContext.Current.Web)
    {
        SPList list = web.Lists["Manager"];
        foreach (SPListItem item in list.Items)
        {
            if (item["Address"] == null)
            {
                item["Address"] = "PLEASE SET THE ADDRESS!";

                item.Update();
            }
        }
    }
}
Step 4: Build and Deploy the Solution
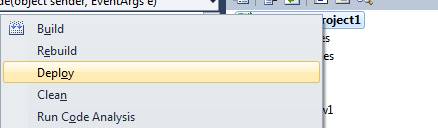
Now we are ready to build and deploy the solution. Right click on the solution and use the Build and Deploy command.  
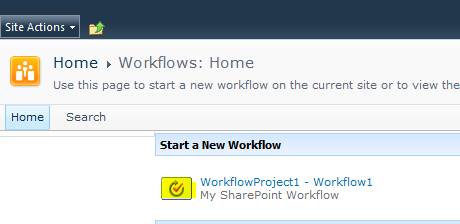
Step 5: Execute the Workflow inside SharePoint
Now we are ready to test the Workflow inside SharePoint. As the Workflow was created as a Site Workflow it will be accessible for all the Lists and Libraries. You can click the Lists link inside the site.
Now click on the Site Workflows link. You will get the following screen.
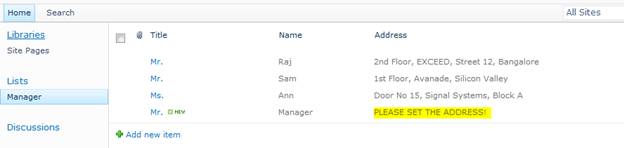
Before executing the Workflow, you need to create a Manager item with Address not assigned.
Click on the highlighted button and your workflow gets executed. Wait for a while and you can see the invalid manager record is updated with the message.
This concludes our article on Workflow using Visual Studio.

Note

For debugging the Workflow, you can set a breakpoint and use the Debug command of Visual Studio. When the Workflow is executed, the breakpoint will get hit.

References


How to edit source in Content Editor Web Part in SharePoint 2010

How to edit Content Editor Web Part with HTML Text editor in SharePoint 2010?

In SharePoint 2010 Editing content Editor Web Part is kind of tricky.  I was unable to find the source and HTML Text editor in content Editor Web Part Property section in SharePoint 2010.
From Format Text Tab on the ribbon toolbar, I saw the HTML drop down list and selected to edit HTML source but the source I insert is not going into the SharePoint 2010 content editor web part at all.
After playing around for while, I came to know how to edit the content editor web part.  I hope this  will help someone who is having issues with SharePoint 2010 Content Editor Web Part.

Adding Content Editor Web Part in SharePoint 2010
Editing Tools | Insert | Web Part

Adding Web Part in SharePoint 2010

Under categories go to media and content to add SharePoint 2010 content Editor web part
Categories | Media and Content |  Content Editor
Media and Content, Content Editor Web Part
Click Add to insert Content Editor Web Part in SharePoint 2010 page
Adding Content Editor in SharePoint 2010
Your web part will say “ Edit this web part to add content to your page”  Click on Content Editor Menu and go to Edit Web Part
Click on Content Editor Menu and go to Edit Web Part
As soon as you click on Edit Web Part, the message in Content Editor web part changes to “ Click here to add content”
Now you can click on HTML under Format Text and click on Edit HTML Source
image
Editing HTML Source in SharePoint 2010 content Editor Web Part
In HTML Source Editor you can input your HTML source.  This is how you edit Content Editor Web Part to add html source in SharePoint 2010
image

Removing the left-hand navigation in SharePoint 2010

How to Hide or Remove the Quick Launch in SharePoint 2010

Trying to customize SharePoint master page and having so much of problem hide or remove the left navigation in SharePoint 2010.  I searched in Google for solutions but it didn’t work well for me.
When I tried to hide the left navigation in SharePoint 2010 from the solutions I got, I was getting a blank space in left side.
Empty Space While hiding Left Navigation in SharePoint 2010
Empty Space While Hidding Left Navigation in SharePoint 2010
Empty Space while editing the master page
hide_the_quick_launch_in_sharepoint_2010_empty_space
 
Many of the solutions also speaks about adding the code Content Editor but that also gave me a blank space in the left hand side.  After long struggle, I made it work by using the code from 
http://chrisstahl.wordpress.com/2010/03/15/hide-the-quick-launch-in-sharepoint-2010/


How to Hide or Remove the Quick Launch in SharePoint 2010 working Solutions for me:

<style type="text/css">
/*–Hide Quick Launch –*/ 
#s4-leftpanel{ 
display:none 

.s4-ca{ 
margin-left:0px 

</style>


Copy above code and past it in your master page on above </head> to

hide Hide or Remove the Quick Launch in SharePoint 2010

hide_the_quick_launch_in_sharepoint_2010_solutions

Hide or Remove the left navigation in SharePoint 2010
Removed the empty space and by hiding the left navigation in SharePoint 2010

No Empty space anymore

Changing SharePoint 2010 default font size

By default, SharePoint 2010 font size is Verdana 8pt and how do I change the font size?  What if I want to change the font size to something like Arial 13?
How do I make it Arial as a default font in SharePoint 2010 content editor web part so that every time user edit contents, it default not to Verdana?
replace_sharepoint_2010_default_font_1
Here are the steps to change default font size in SharePoint 2010
1. I am using the CSS from Serve’s Blog Copy this CSS and create a new CSS file in SharePoint Designer or download from below
.ms-bodyareacell td, .ms-bodyareacell p, .ms-bodyareacell div, .ms-bodyareacell span,
.ms-bodyareacell p, .ms-bodyareacell a,.ms-bodyareacell a:active, .ms-bodyareacell a:hover,
.ms-bodyareacell a:link, .ms-bodyareacell a:visited,.ms-bodyareacell td,.ms-bodyareacell div,
.ms-bodyareacell font
{
font-size:13px;
font-family:Trebuchet MS,Verdana, Arial;
letter-spacing: normal;
color:black;
}
.ms-bodyareacell h3 a, .ms-bodyareacell h3 span, .ms-bodyareacell h3 div,.ms-bodyareacell h3 p,
.ms-bodyareacell h3 font
{
font-size:15px;
color:black;
}
.ms-wpheader
{
background-color:#e9e9e9;
}
2. Save your CSS file. In this case, I am calling as custom2.css and saving this file in style library
default_font_face_change_in_sharepoint_2010_2
3. Open your master page and add a reference to your new custom2.css file
custom_font_for_sharepoint_2010_3
4. Now go back to your SharePoint page and edit. You will see your default font is changed to what every you specified in your CSS
sharepoint_2010_text_change_4
This is how you can change SharePoint 2010 default font to something you like.

Publish a Form with InfoPath Forms Services for SharePoint 2010

In this blog I will go through the process of creating and then publishing a simple form to be used as a template in SharePoint 2010 using Forms Services. This feature is only available in the Enterprise Version of SharePoint 2010.
I will perform the following steps:
1. Ensure the Forms Services Feature is enabled at the Site Collection and Target Site level.
2. Create the form in Info Path Designer 2010
3. Publish the form to SharePoint.
4. Test the form in the browser.
Site Collection Features
SiteCollectionFeatures-1.png
From the home page of the top level site of a site collection I choose Site Actions>Site Settings (I am a site collection administrator).
SiteCollectionFeatures-2.png
I click on Site Collection Features under Site Collection Administration.
SiteCollectionFeatures-3.png
I scroll down to the Site Collection Features and verify that the SharePoint Server Enterprise Site Collection features feature is activated, which it is by the blue Active icon.
Site Features
SiteFeatures-1.png
I go to Site Actions>Site Settings
SiteFeatures-2.png
This time I click on Manage site features in the Site Actions heading.
SiteFeatures-3.png
I verify that the SharePoint Server Enterprise Site Features is activated. (Which it is). Now that I have verified that Forms Services is activated correctly I'm ready to design my form. Since the focus is on how to get the form into SharePoint as a template I will keep the form very, very simple.
InfoPath
InfoPath-1.png
I open up Microsoft InfoPath Designer 2010. There are now two parts to Info Path. Designer and Filler. Since I am designing a form I use Designer.
InfoPath-2.png
I select Blank Form and push the Design form button.
InfoPath-3.png
For the purposes of this blog I will simply change the Form title. Info Path Form designing is a powerful skill to have. Normally when I am designing an info path form I start with building out the Schema and then drag the main sections onto the Form to build out the controls. In this blog I am focusing on the process of publishing the form I design into SharePoint to be used as a template so I'm keeping it really, really simple.
InfoPath-4.png
At this point optionally I can save the form template. I normally do in case I want to make some changes later on, so I click the Save Icon.
InfoPath-4_1.png
At this point optionally I can save the form template. I normally do in case I want to make some changes later on, so I click the Save Icon. I save the form template (.xsn) file to my desktop (not shown).
InfoPath-5.png
To publish the form template to SharePoint I hit File> Publish
InfoPath-6.png
I select SharePoint Server.
InfoPath-6_1.png
I put in the address of my site and push next.
InfoPath-7.png
For this example I'll leave these settings as is and hit next.
InfoPath-8.png
For this example I'll leave these settings as is and hit next.
InfoPath-9.png
When SharePoint executes this process it's going to create a new form library for me and use my form template as the template for that library. I'll call this library 'importantLibrary' and hit Next.
InfoPath-10.png
For this blog I hit next.
InfoPath-11.png
I verify my settings and then hit Publish. (I am prompted for credentials from SharePoint so i put them in (not shown)
InfoPath-12.png
I check the box to Open this form library and hit Close.
SharePoint Form Library
SharePointFormLibrary-1.png
I select Documents in the Ribbon and click New Document

SharePointFormLibrary-2.png

My Important Form opens in the Browser. If I had any fields I could fill them out here. (The fields would be columns in SharePoint. ) Since i don't I just click Save.
SharePointFormLibrary-3.png
I name the file (in this case I named it Important) and hit save.
SharePointFormLibrary-4.png
I hit close.
SharePointFormLibrary-5.png
That's it. The focus of this blog is on publishing a form template to SharePoint 2010 using Info Path Designer 2010 and Forms Services.